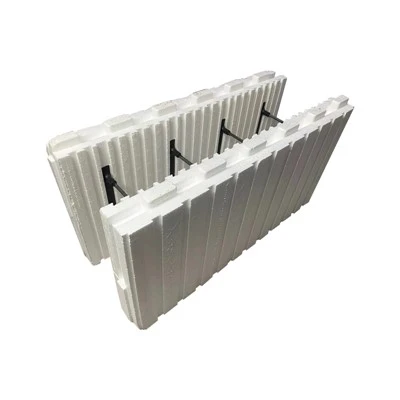
EPS ICF forms are very well suited to basement walls because they can create a reinforced-concrete retaining wall while providing continuous insulation on both sides. This is one of the most common and useful applications of ICF.
The basic basement concept is:
Excavation → footing → ICF reinforced-concrete walls → floor slab → waterproofing/drainage → backfill → upper floor/roof
A typical basement wall looks like:

The reinforced concrete core resists soil pressure, while the EPS forms provide insulation.
Why ICF Is Attractive For Basements
Basements have several special problems:
***Soil pressure
***Groundwater
***Moisture
***Temperature loss
***Potential frost
***Lateral loads
***Difficult exterior access after backfilling
ICF addresses several of these at the same time.
***Main advantages
***Structural strength
The reinforced concrete core provides a strong retaining wall.
***Continuous insulation
***Insulation is already integrated into the wall.
***Good moisture/condensation performance
The insulated wall keeps the interior concrete surface warmer, which can help reduce condensation risk when the overall assembly is correctly designed.
***Fast wall construction
***Blocks are stacked, reinforced and filled with concrete.
***Good connection to upper ICF walls
The basement and upper levels can form one continuous structural system when properly engineered.
The Main Steps For A Better Basement
Step 1 - Design the basement first
Before excavation, the basement should be designed by the appropriate professionals.
The design should account for:
***Soil type
***Soil pressure
***Groundwater
***Frost conditions
***Basement depth
***Wall height
***Wall thickness
***Concrete strength
***Rebar size and spacing
***Footing size
***Floor slab
***Drainage
***Waterproofing
***Backfill
***Seismic conditions
***Local building codes
This is particularly important because the basement wall is essentially a retaining wall.
You should not select an ICF wall thickness or rebar layout simply from a generic residential detail.
Step 2 - Excavate
Excavate the basement to the required depth and provide enough working space outside the future wall for construction and waterproofing.
The excavation must be stabilized appropriately based on the soil conditions.
At this stage, consider:
Basement depth + footing depth + slab elevation + drainage system
Step 3 - Prepare the footing
The footing transfers the basement-wall load into the ground.
A typical sequence is:
Prepare subgrade → install footing reinforcement → form/pour footing → install wall starter reinforcement
Vertical reinforcing bars extend from the footing into the future ICF wall.

The wall-to-footing connection is a critical structural detail.
Step 4 - Start stacking the ICF forms
Once the footing is ready, ICF blocks are stacked course by course.
Install:
***Straight blocks
***Corner blocks
***T-junctions
***End blocks
***Window/door bucks where required
***Reinforcement
The installer checks the wall continuously for:
Level + plumb + dimensions + alignment
Step 5 - Install reinforcing steel
The basement wall needs reinforcement because it must resist lateral earth and water pressure.
The reinforcement generally includes:
***Vertical rebar
***Transfers loads vertically and helps connect the wall to the foundation.
***Horizontal rebar
Provides reinforcement along the wall and helps resist bending and cracking.
The exact quantity, size, spacing and lap/anchorage are engineering requirements.
Step 6 - Install basement windows and doors
Basement window openings can be created using ICF bucks, just as with above-ground ICF construction.
For example:

Basement windows need special attention to:
***Waterproofing
***Window flashing
***Window wells
***Drainage
Emergency egress requirements where applicable
Step 7 - Install plumbing and electrical penetrations
As with the above-grade ICF walls, plan penetrations before concrete is poured.
Typical basement penetrations include:
***Main water service
***Sewer line
***Electrical service
***Plumbing
***HVAC
***Radon mitigation piping where required
***Exterior drainage
***Sump discharge
Larger penetrations should use properly designed sleeves/details.
Avoid randomly drilling the reinforced concrete core after construction.
Step 8 - Brace the ICF walls
Before concrete placement, the walls need a proper ICF alignment and bracing system.
This helps:
***Keep walls plumb
***Maintain the correct wall dimensions
***Support workers
***Prevent movement during concrete placement
The taller the basement wall, the more important correct bracing becomes.
Step 9 - Pour the concrete
Concrete is placed inside the ICF cavity to create the structural basement wall.
The concrete should be placed in a controlled sequence and rate appropriate for the ICF system.
During the pour, workers monitor:
***Wall alignment
***Buck movement
***Form movement
***Concrete leakage
***Concrete consolidation
***Reinforcement position
A good concrete placement operation is essential to achieving a properly formed wall.
Step 10 - Waterproof the exterior
ICF is not automatically a waterproofing system.
This is one of the most important points when building a basement.
A below-grade ICF wall normally needs an exterior waterproofing/drainage strategy appropriate to the site.
This can include:
Concrete wall → waterproofing membrane/coating → protection/drainage layer → drainage aggregate/drainage board → backfill
The exact system depends on soil and groundwater conditions.
Step 11 - Install perimeter drainage
A basement should normally have a properly designed foundation drainage system.
A typical concept is:

The perimeter drain collects water and directs it toward an appropriate discharge system, such as:
***Gravity drainage where possible
***Stormwater system where permitted
***Sump pit and pump
***The drainage design must comply with local regulations and site conditions.
Step 12 - Install the basement floor
A typical basement floor can include:
Compacted base → capillary/moisture control → insulation where required → reinforced concrete slab → floor finish
For a heated basement, rigid insulation can be installed beneath the slab, and radiant floor heating can be incorporated.
That creates a very effective combination:
ICF insulated walls + insulated slab + radiant heating
Step 13 - Connect the upper floor
The basement walls can support the first-floor structure.
Possible floor systems include:
***Reinforced concrete slab
***Wood I-joists
***Engineered wood beams
***Steel framing
***Other engineered floor systems
The floor-to-ICF connection should be designed so the loads are properly transferred into the reinforced concrete wall.
Step 14 - Backfill
Do not backfill simply because the concrete has been poured.
The wall needs to achieve the required concrete strength, and the waterproofing/drainage system must be complete and protected.
Backfill should be placed in a controlled manner to avoid excessive loading or damage.
Heavy equipment should not be operated too close to the basement wall unless the design allows it.
Basement Insulation Advantage
This is where ICF performs particularly well.
A conventional concrete basement can require:
Concrete wall → waterproofing → separate insulation → interior finish
An ICF basement wall can integrate:
Insulation + concrete structure

This can provide a relatively continuous thermal envelope around the basement.
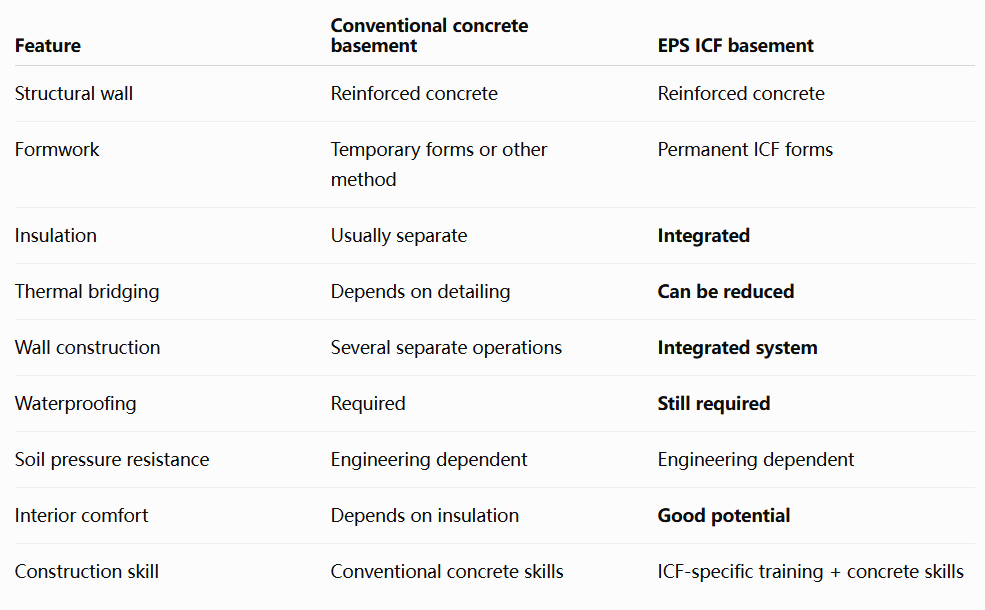
ICF Basement vs. Traditional Basement
Important Basement Details
Waterproofing
The biggest basement problem is often water, not structural strength.
Pay particular attention to:
***Wall waterproofing
***Wall/floor joint
***Footing
***Penetrations
***Window openings
***Window wells
***Sump system
***Drainage
Wall-to-slab joint
The connection between the basement wall and floor slab needs appropriate detailing to prevent water intrusion.
Radon
Depending on the location, soil conditions and local requirements, radon-resistant construction may need to be considered, particularly for below-grade occupied spaces.
***Thermal bridge at the footing
The floor and wall insulation should be designed to minimize unnecessary heat flow through the foundation.